
Data Migration to AWS is a key service Neon Surge offers, this case study breaks down the process we ran for a specific client.
The Naturalis came to Neon Surge with a goal and a timeline. The goal, to move 280TB of data off of their current data warehouse solution. The timeline, was yesterday.
Some background
The Naturalis Biodiversity Center in Leiden, The Netherlands has stored their archive data at a data warehouse on tapes. As the museum generated various image data for archival for the last 5 years, they pushed data to this offsite warehouse daily. However, they needed to move to a different warehouse, ideally somewhere affordable, highly available, and as automated as possible.
Enter Neon Surge
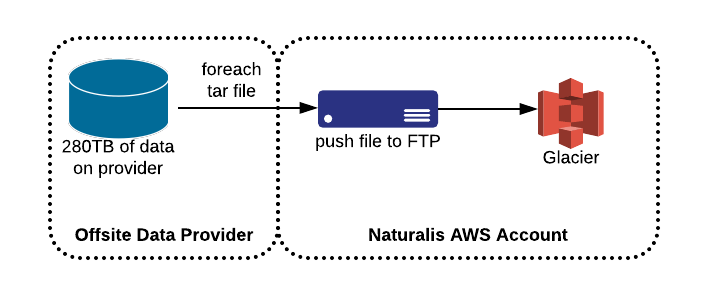
The Naturalis had proposed going with something such as Amazon Glacier, as this offered a competitive price for data warehousing and it fit their usage model. We confirmed the estimated monthly and migration costs of this solution which was within’ the desired budget for this project. Now, how we got the data into AWS was the next goal. One of our senior engineers jumped into this and proposed a handful of solutions.
- Send the data warehouse provider an Amazon Snowball, have them fill it up, and then send them another until all our data was migrated into AWS.
- Have the data warehouse provider push the data directly into S3.
- Have the data provider (or us) host a file sharing server of some type, which one of us pushes/pulls data from/to and we do the migration over the internet ourselves.
Some of the problems with the first two options which we discovered are that the data warehouse staff have limited knowledge and no automation to restore tapes to S3 or to a snowball. Secondarily, the tape read-speed was not much faster than the speed we could handle ingestion over the internet. Finally, the Naturalis wanted to do some extraction, processing and de-duplication of the tar files.
After gathering all this information and discussing this with the provider and other senior technical staff at the Naturalis we decided to go with the third option.
During earlier discussions, we found out this particular data is actually public and is available upon-request to their researchers, so this reduces the security impact of transferring this data via a secure channel. Knowing that, to maximize the speed at which they could transfer us data we chose to host a FTP server on Amazon EC2 and provide them with credentials to stream us data as quickly as possible.
Migration details and integrity verification
Since their current data warehousing solution had wrapped all the files into tars, and seeing how S3 is billed by storage size and not number of files (except an one-time cost for the PutObject request), we saw that this situation offered an opportunity to decompress these tars and put the objects directly into S3. This would allow for single-item retrieval and validation that the data they want is in S3. This would modify our proposed workflow to the following. This made our workflow a bit more complicated.
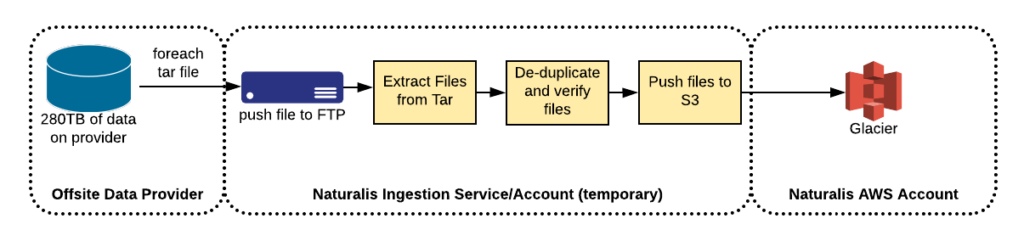
Another concern we raised was guaranteeing the successful delivery of these files. In order to satisfy this concern, the data warehouse provider gave us a CSV of all MD5 sums of the tar files so we could validate successful delivery of files to avoid possible corruption.
The next knowledge-hurdle to keep in mind for a migration such as this, is that we can’t/don’t want to be storing data very long on our instance. We’ll want to migrate it as soon as possible into S3. We’re talking about 280TB here, so having an instance with that large of a disk is not feasible or cost effective. We decided we would need a program, of sorts, which would handle the data as we received it, extract it, and push into S3. So, based on available knowledge, concerns and the desired workflow, our senior engineers developed a Python-based multi-threaded daemon to handle the ingestion, de-duplication, and processing.
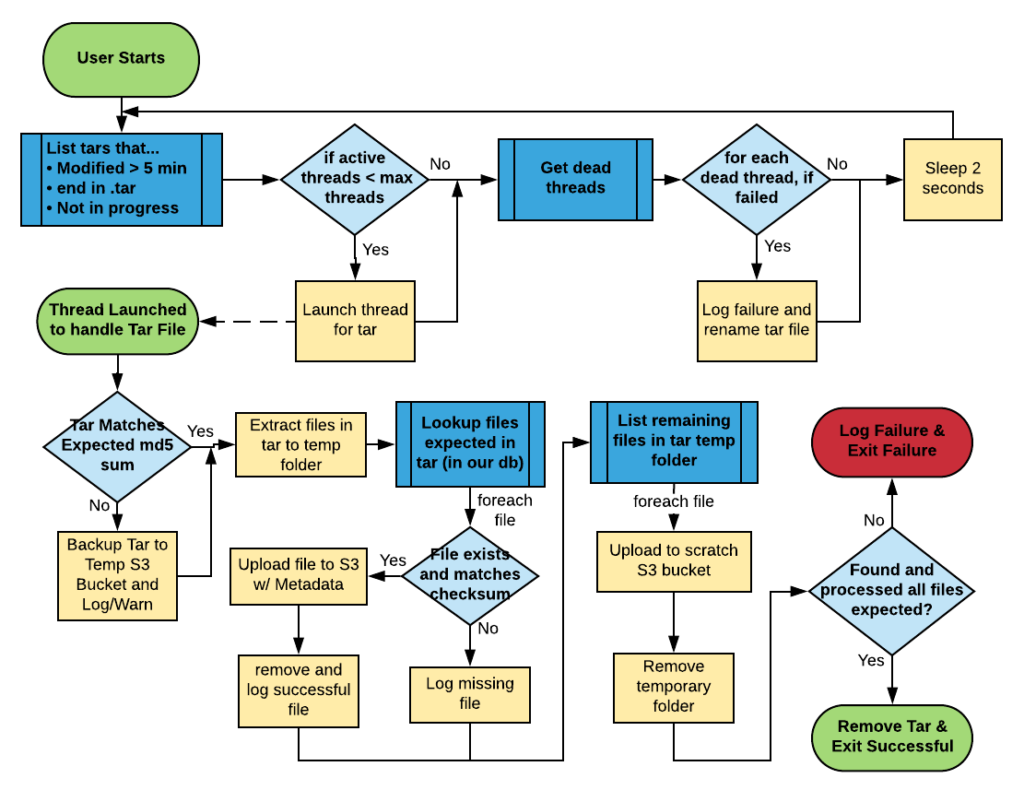
We flowcharted the logic that this program would need to do, and revised it until it took everything into account, and matched our client’s needs.
Some Final Nitty-Gritty
One final aspect of the ingestion daemon that we didn’t mention above, is that every step along the way during processing of the tars and the individual files, it stores and updates the state of each tar and file in a simple MySQL database. This database can be used for validation purposes, and comparison purposes. And since the Naturalis is using MySQL, at the end of the migration a dump of this database will be provided to them for reporting/accounting and informational purposes.
Now we have a workflow and a program in place to handle the data coming at us, next came instance/network/disk size/disk-io sizing. After some initial tests, we determined the largest bottleneck was the high disk I/O requirements of handling both ingestion and processing, and the next bottleneck was network IO. The processing tasks such as generating MD5 sums, and extracting files from a 1GB tar are quite heavy on disk io. Based on some initial speed tests with the data warehouse, we found we would be receiving a new tar file every 10-15 seconds, so we’ll need to handle them that fast, or faster. We settled on using an i3.xlarge High I/O Instance and utilizing this instances 1TB NVMe SSD Instance Store to get the speed we wanted at a very reasonable cost. We’re using that instance store specifically as our “buffer” where we receive, verify, extract, and process files on, utilizing that high-io capabilities that are geared for the task at hand.
Under full load of having data streaming at the maximum speed expected whilst processing the data, our instance resources (CPU/IO/Network) were right around 60% utilization, making this the perfect instance type for the job. It had some room to spare to handle some jitter and noisy-neighbors, but wasn’t blowing the bank either.
Performing the data migration
After two test migrations with everything in place, the details were all worked out. We generated some reports, and did some data sampling to verify that they were in-fact migrating data successfully. The program above reported its status along the way into a MySQL database, making querying this trivial for reporting and verification purposes. Both tapes migrated with 100% success, all tars were delivered to us and validated their MD5 sums. All the files had the files we were expecting them to have inside of them. Some of the tars had extra files (this is a known issue) and they are saved to the side to remove at a later date. We set up some monitoring on the disk/CPU of this migration server, and gave the go-ahead for the full migration.
The data migration began on December 22, 2017 and is currently in progress with a perfect track record (on our piece) as of January 10, 2017 (the time of this writing) and is expected to finish on time in late-February.
During the migration (aka, monitoring)
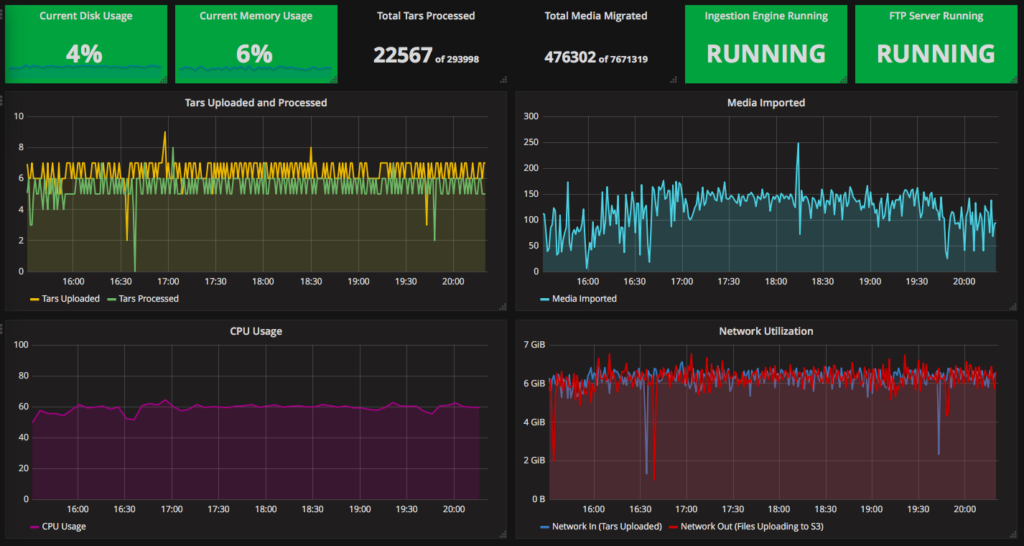
Another aspect of this project is being able to quantify and qualify the service health, and to easily digest it visually. To accomplish this we engineered some custom CloudWatch Metrics collected from a custom Python-based daemon on the ingestion server.
Then we setup various CloudWatch Alarms based on some built-in and some custom metrics to notify us whenever any problems arise. These will alarm us both via email and Slack (our preferred ChatOps solution).
And finally, we created a dashboard for the Naturalis and the data provider to keep an eye on the migration status and any relevant variables. This is visualized using Grafana, connected to the CloudWatch Custom and some built-in metrics.
After the data migration
Once the migration completes, a full report, logs, and summary will be provided to both the data provider and the Naturalis. Any extra files we may need to migrate and process manually, we will do so afterwards based on the report.
Article References:
- Naturalis Biodiversity Center: https://www.naturalis.nl
- AWS EC2 i3 High I/O Instances: https://aws.amazon.com/blogs/aws/now-available-i3-instances-for-demanding-io-intensive-applications/
- NVMe SSD Instance Store: http://docs.aws.amazon.com/AWSEC2/latest/UserGuide/InstanceStorage.html
- Grafana: https://grafana.com/